I continued working on the Baffles. I finally finished those up.
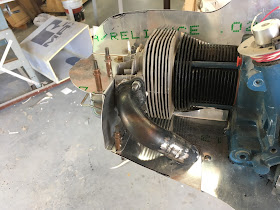
This shows the detail at the L/H cylinder. I used .020 7075-T6 aluminum sheet for all of these baffles. That's not a magic alloy, its what I had laying around. It does tend to crack pretty easy, but I guess that's what a stop drill is for.
Support is where you find it!! I made a bracket that picked up one of the case bolts and used it to support the upper baffle. I used clip nuts here so the baffles could be removable.
This shows the detail on the R/H cylinder. Note the cut outs for the exhaust. All around the edge of these baffle plates a blade of silicon rubber will be added. this will make a flexible seal between the baffle and the inside surface of the cowl.
This picture shows the silicon seal added to the baffles. I needed to make a retainer plate for the silicon. This served two purposes. It clamped up the silicon seal and it created a stiffener that keeps the baffles from bending away. I made the retainer by bending some aluminum over a form block.
This is the MDF Form block. note the bend relief cuts all along the edge near an outside curve. When the metal is formed over it compresses along the edge and causes a wrinkle, the slits allow the metal to move and makes it much less prove to wrinkling.
After I finished with the metal work, I made a template for the final trim of the cowl. There is a fly weight that is attached to the aft face of the prop flange that needs to have clearance to the cowl. The old trim was just a rough cut any way.
finally I added countersunk washers to the main cowl fasteners. These will spread the fastener load out over a greater area and allow for a flush countersunk head. I covered the show face in tape and then sand blasted the back side. I countersunk the cowl fiberglass, sanded a small area under the washer and then bonded the washers to the fiberglass. I'm using a cleco with a small washer to clamp the washer during cure.


No comments:
Post a Comment