 |
| R/H Cheek cowl Patterns. |
1/8" Masonite was used for the templates. The original pattern was plotted on printer paper and 3M 777 spray adhesive was used to affix them. do not use water based adhesive for this step, the paper will swell and distort. at some point the contour reverses and the same template is used for the fore and aft position.
 |
| Cowl template in position |
I trial fitted the template at this point to ensure I had enough excessive flange area. As shown in this view, more tape had to be added above and below the cheek cowl. The actual part will only be a 1 inch flange beyond the cheek cowl, but excessive edge is needed for the building of the lay up tool and plaster splashes.
 |
| foam being sanded flush on the belt sander |
All of the templates were lightly tacked to the foam with 5 minute epoxy of bondo. just a small dab is all that is needed, because the template is removed later. The foam is rough cut on the band saw and then flush sanded on the belt sander .
 |
| templates being bonded |
the foam had to be pieced together for the larger templates. a small bond was all that was needed and it was placed such that it was buried inside the final contour.
 |
| foam blocks in place on master template |
The foam was bonded with a very small dab of bondo to the master template. I want to remove the foam later after it has been shaped. in this view, the plan view off the foam was sanded flush to the template.
 |
| Top surface was sanded tangent to the foam blocks |
In this view the sanding stick was used with 36 grit paper to sand the top surface tangent to the foam. The surface is sanded until the edge becomes a line.
 |
| corners sanded tangent |
.
as you can see the results are excellent!!!
 |
| Foam shown during final shaping. |
 |
| Another view of the final surface |
After the foam was shaped I was able to peel the main template off without damaging the foam.
 | |
| 36 grit sandpaper tacked to the cowl |
After the cowl was formed, it was necessary yo contour the base so it would fit flush to the engine cowl. I hit on the idea of sanding the contour into the foam cheek cowl cores. It worked like a charm!!!
 |
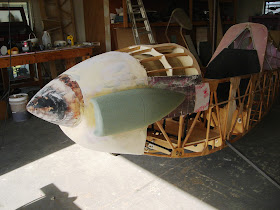
| cheek cowl bonded into position |
After the cheek cowl was fit to the main cowl, it was bonded in place. The next step was to lay one layer of 8 oz fiber glass on the foam so I could complete the finishing. this is urethane foam, so any suitable laminating resin can be used. Because of cost and time considerations I used polyester resin. The cure was complete in 45 minutes.
 | |
| L/H cheek cowl/inlet |
The L/H cheek cowl was fabricated similar to the R/H cheek. The main difference is the addition of a cooling air inlet.
the cowl was also sanded into position and later attached.
 |
| L/H cowl in position |
As I write this update i have completely coated and block sanded the cowls. I have added blend fillets between the cheeks and the main cowls.
The final finish and removal of the cowls is the subject of the next Blog.
No comments:
Post a Comment